Step-by-Step Guide to Transferring a Domain to QuickServers
When you move your domain to QuickServers, you can handle registration, DNS, hosting, billing, and renewals all from one secure customer portal. Transferring your domain is easy if you follow the right steps. You can get better control, lower renewal prices, or make it easier to manage multiple domains.
This step-by-step guide shows you how to move your domain to your QuickServers account without any problems.
1. What You Need to Do Before You Start a Domain Transfer
Before you move your domain, make sure you meet the following conditions:
-
The domain is at least 60 days old
-
The current provider has not locked the domain
-
The WHOIS contact information is up to date
-
You have access to the domain's authorization (EPP) code
-
There are no pending disputes or holds on the domain
Getting these ready will speed up your transfer as much as possible.
2. Begin the Transfer from the Customer Portal of QuickServers
To start moving your domain:
-
Go to the QuickServers website
-
Sign in to your "customer portal"
-
Click on the Domains link
-
Click "Transfer in a Domain"


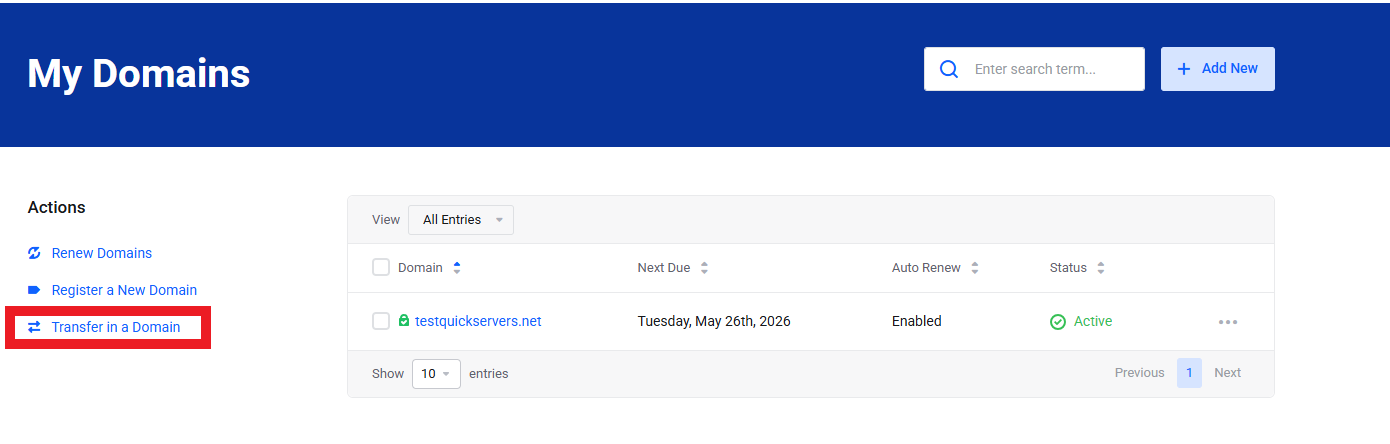
This opens the transfer interface, where you can type in your domain name.
3. Type in the Domain You Want to Move
In the field of transfer:
-
Enter the domain you want to move to QuickServers.
-
Click "Check Transfer Eligibility"
The system will check:
-
If the domain is unlocked
-
If a transfer is allowed
-
If the domain extension works with standard transfers
-
If you need to give any more information
You can move on if the domain is eligible.
4. Type in the EPP/Auth Code for the Domain
To finish the request for transfer:
-
Find the Authorization Code (also known as the EPP code) from your current provider.
Put it in the right field by copying and pasting it.
This code proves that you own the domain and lets QuickServers handle the transfer.
Tip: If you can't find the code, check the control panel of your current provider for "EPP Code," "Auth Code," "Transfer Key," or something like that.
5. Look over the add-ons and the transfer period
QuickServers will show you this before you check out:
-
The transfer fee (which usually includes a 1-year renewal)
-
Optional extras, like domain privacy
-
The length of time you want to register
-
The details of the transfer confirmation
Before you move on, double-check that everything is correct.
6. Finish the payment and checkout process.
After looking over your order:
-
Click on Checkout
-
Use your QuickServers account to finish the payment
-
Wait for confirmation that your request to transfer has been sent
The transfer process officially starts when the request is sent.
7. Give the Transfer Email your approval.
Most domains need email approval from the owner.
You will get a message at the administrative contact email for the domain, which you can find in WHOIS.
You have to:
-
Read the email
-
Give your approval for the transfer request
-
Confirm the authorization code (if asked)
This step makes the transfer go faster.
8. Wait for the Domain to Finish Moving
Usually, standard domain transfers take:
-
24–72 hours for most TLDs
-
5–7 days for some extensions
During this time:
-
Your email and website should keep working as usual
-
You can check on progress from your QuickServers portal
Once the domain has been successfully moved, you will get an email confirming it.
9. Use the QuickServers Portal to Manage Your Domain
Your domain will show up under My Domains in your customer portal after the transfer is done.
You can then control:
-
DNS and nameservers
-
Domain privacy
-
Auto-renew settings
-
Contact information
-
Forwarding or redirection
-
Extra domain services
All of the tools for managing your domain are in one easy-to-use dashboard.
10. Tips for a Smooth Transfer
To avoid delays or failed transfers, make sure of the following:
-
Domain privacy is temporarily disabled before asking for the transfer
-
The WHOIS admin email is up-to-date and accessible
-
The domain is unlocked before you enter the EPP code
-
You quickly approve all verification emails
-
You start transfers at least two weeks before they are due
If you follow these tips, transfers will go faster and with fewer problems.
The Bottom Line
Moving your domain to QuickServers is a quick and safe way to bring all of your online assets together on one platform. QuickServers gives you everything you need to manage your domains with confidence, including full DNS control, easy renewal options, and centralized management.
QuickServers makes transferring domains quick, safe, and easy, whether you're moving just one site or a whole portfolio.
